

In this tutorial, I'll dive into how to install Zen+ kernel on Fedora 37 as well as how to uninstall Zen+ and troubleshoot it (if needed).
Want to say thanks for an ad-free, subscription free experience and top-notch content?
Grant yourself root powers
To make the rest of this process easier, we'll elevate our permissions to root for this session.
sudo suMake sure Fedora is all shiny and new
The command below will allow you to both update and upgrade fedora and the --refresh flag will cleanup any outdated, unused stuff.
dnf update --refresh -yBring in the dev tool army
Metaphorically summon an army of nanobots/cyborg dwarves by downloading all the dev tools you should need to get the job done.
dnf install patch wget gcc ncurses-devel git git-core flex bison openssl-devel openssl elfutils-libelf-devel lz4 zstd bc grubby neofetch -y && dnf group install "development tools" -yUnravel the mysteries of your CPU
In order to squeeze every last drop of goodness out of your CPU with your new kernel, you're going to need to dig down into its deepest darkest secrets. Ok, maybe you don't need to go that far down the rabbit hole, but you do need to know how many threads you're working with.
lscpu | grep -w "Model name:\|^CPU(s):\|Thread(s) per core:"In my case, the output looks like this:
CPU(s):                          8
Model name:                      Intel(R) Core(TM) i5-10210U CPU @ 1.60GHz
Thread(s) per core:              2
The CPU(s): value is the one that matters here. It tells me I'm working with 8 threads. Be sure to take note of this value because you'll need it later during compiling.
Get the latest Zen+ Kernel from Git
Now things start to get serious - it's time to grab the latest iteration of Zen+ kernel from Git, throw it in a folder and cd into it:
git clone https://github.com/zen-kernel/zen-kernel.git home/"$USER"/zenplus --depth 1 && cd home/"$USER"/zenplusCopy the configuration file from your active kernel
Now we'll CD to the boot directory and list out the configuration file for Fedora's kernel.
cd /boot && ls -a | grep "config" | grep -v -e "debug"In my case, the output is:
config-6.1.11-200.fc37.x86_64I'll copy the name of the file from my output and replace [config file name] in the example command below with the actual name of the file (i.e. cp config-6.1.11-200.fc37.x86_64 /home/"$USER"/zenplus/.config).
cp [config file name] /home/"$USER"/zenplus/.config && cd /home/"$USER"/zenplusConfigure your kernel
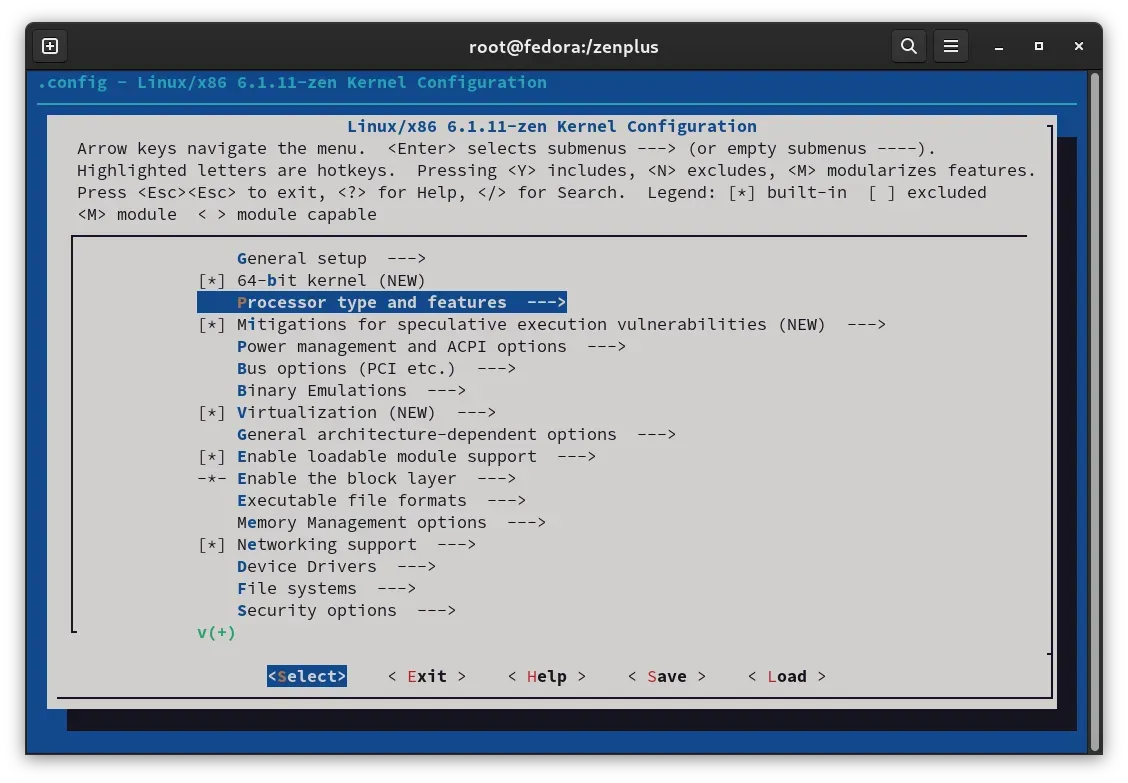
Now it's time to optimize Zen+ kernel by cleaning up stuff we won't need specific to the hardware of whatever machine we're compiling on. Before you begin, take a moment to look over the legend at the top of the configuration GUI. It's fairly self explanatory, however it's important to note that M (modularize) will conditionally enable a module if it's needed rather than completely disabling it or enabling a module when it's not applicable to the hardware on your device. This is a good option for people who aren't sure whether or not a given module is needed. To access the configuration GUI, simply use the following command:
make menuconfigTo begin, we'll use the down arrow key to navigate to Processor type and features - - - > and hit the enter key to access the submenu for this category.
In this specific instance, I know from the model information I pulled earlier that I'm working with an Intel i5-10210U cpu and graphics are integrated, meaning they're handled by the CPU and I don't have a dedicated graphics card.
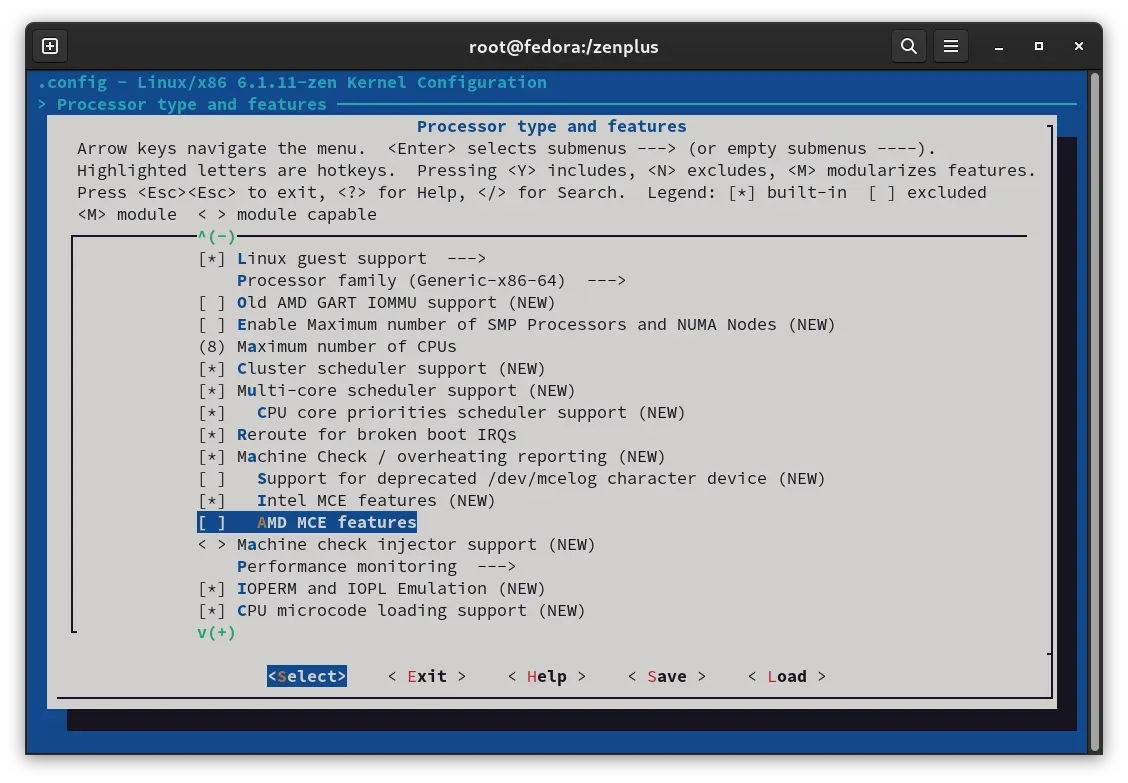
Since I don't have an AMD cpu for this build, I can safely disable features like AMD MCE that are specific to AMD architecture. After disabling all non applicable modules, use the right arrow key to select < Exit > and hit enter to return to the parent menu.
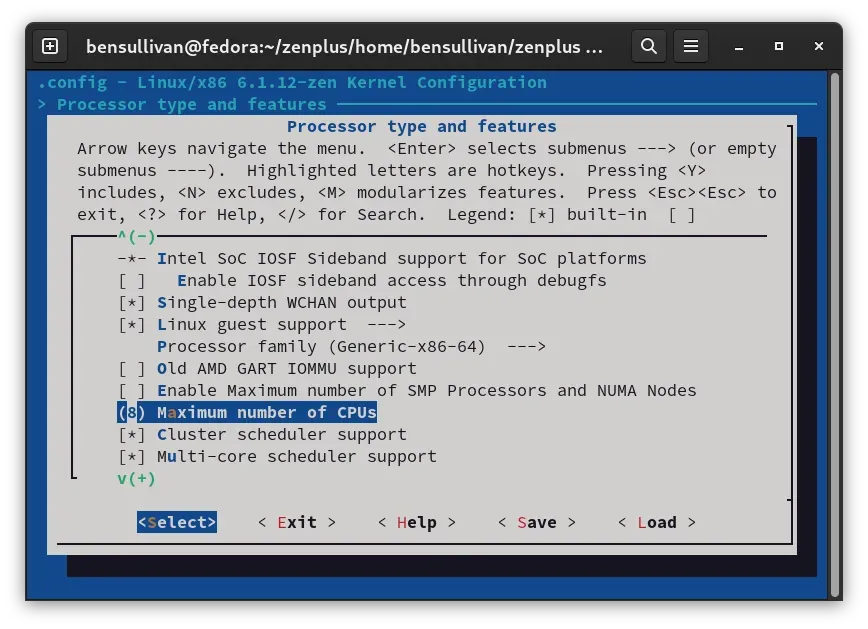
While in processor settings, you'll also want to set your max number of CPUs to match the output you got earlier. In my case, it's 8 so I'll enter 8.
Next we'll cleanup unnecessary GPU modules by selecting Device drivers - - - > and from that submenu, navigating down to select Graphics support - - - >.
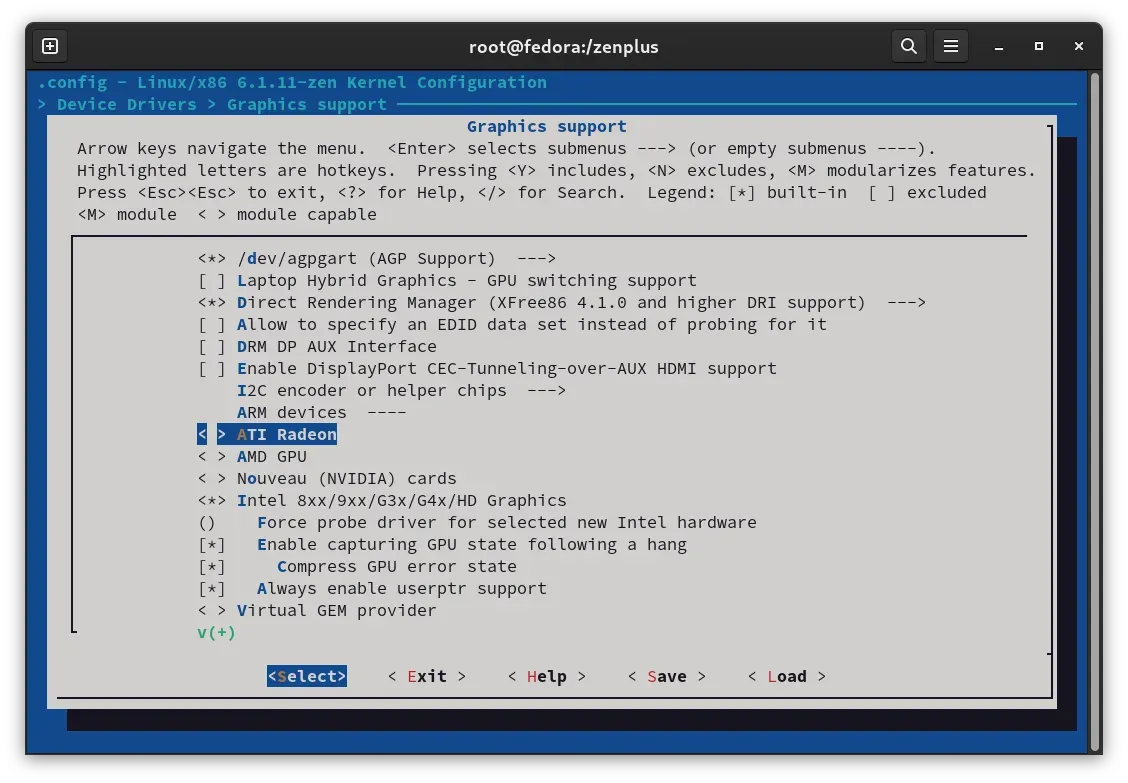
Given that I don't have a dedicated graphics card and know that my graphics are integrated Intel UHD, I can safely disable any AMD/Radeon modules as well as any NVIDIA modules. Graphics can be a bit trickier than CPU since some systems can use both integrated graphics and a dedicated GPU in some instances. Here are a few scenarios to help you understand how to proceed in a situation like this:
- If you only have a CPU with integrated graphics and don't have a dedicated graphcis card, you can safely disable drivers for other manufacturers. For example, if I have an AMD chip with integrated graphics, I can safely disable any AMD/Radeon or NVIDIA specific modules.
- If you are certain that your CPU does not support integrated graphics, you can safely disable graphics drivers specific to your CPU unless your graphics card is the same brand as your CPU (i.e. don't disable AMD/Radeon drivers if your dedicated graphics card is Radeon and you have an AMD CPU without integrated graphcis). Otherwise, if you have, for example, an AMD chip without integrated graphics and a dedicated NVIDIA GPU, you could safely disable AMD/Radeon graphics drivers as well as Intel specific ones.
- If you are certain that your CPU does support integrated graphics and have a dedicated graphics card as well, you should not disable graphics drivers specific to your CPU. For example, if you have an Intel chip with integrated graphics and a dedicated NVIDIA GPU, you should leave Intel related modules along with NVIDIA related modules enabled and only disable AMD/Radeon specific drivers.
- Pro tip: Whenever in doubt, use M to modularize rather than disabling modules.
More granular configuration (optional)
If you feel ultra confident that you know your hardware, you can optionally use the command below to walk-through which drivers are enabled at a much more granular level. There's no need to do this and it's not for the faint of heart, so feel free to skip this step and proceed to the next one.
make oldconfigZen+ kernel compiling time
Now that all of the kernel customization is complete, it's time to compile your kernel. This is where your the thread count we grabbed earlier comes into play. In my case, I have 8 threads, so I'll be using make -j8 to compile my kernel. Be sure to replace that number with whatever applies to your specific CPU. For example, if you have 4 threads you would use make -j4 or if you had 16 threads you would use make -j16.
Side note: compiling is going to take a looooooooong, looooooong time. While you're waiting, feel free to ponder the meaning of life or call a childhood friend you haven't spoken to in decades to fill them in on every detail they've missed of your life. Also, feel free to let me know the outcome of whatever you choose to do to fill the time in the comments below. I'd love to hear what creative things people come up with to wait out a really long compile task.
sudo make -j[thread number here]Install your custom kernel
Assuming your natural life was long enough to make it to the end of the compile, it's now time time to install the fruits of your effors. Run the following command to make the install:
make modules_install installPro tip: should you encounter any issues or need to go back and redo anything, simply cd into the home/"$USER"/zenplus directory and use make clean prior to re-running the install command above.
Install is also going to take an awfully long time, so prepare yourself.
Pre-reboot groundwork
In order to select the kernel at reboot, we'll need to enable the grub menu which is hidden by default on newer iterations of Fedora. To do this, we'll run the following command:
grub2-editenv - unset menu_auto_hideReboot and behold the glorious splendor that is Zen+ kernel
Lastly, we'll simply reboot the machine and select the new kernel using the up/down arrows at the grub menu:
rebootSide note: your new kernel should be named something like vmlinuz-6.1.11-zen+ at the grub menu. This is the one you'll want to select. If you have any issues with the kernel, you can always select the default Fedora kernel at the grub menu to boot with that.
Set Zen+ as the one kernel to rule them all
After your machine boots up, give it a good test run and make sure everything is working as expected. If you're happy with Zen+ kernel and want to make it the default kernel you use, you'll need to crack open a new terminal window and make a configuration change using Grubby, which we installed earlier.
Re-elevate permissions to root:
sudo suGrab a list of all the kernels installed on the system:
grubby --info=ALL | grep -E "^kernel|^index"The output should be something along the line of this:
index=0
kernel="/boot/vmlinuz-6.1.11-zen+"
index=1
kernel="/boot/vmlinuz-6.1.11-xanmod1"
index=2
kernel="/boot/vmlinuz-6.1.10-200.fc37.x86_64"
index=3
kernel="/boot/vmlinuz-0-rescue-3baa227c5aaf4141b094da71746960de"
In this instance, I want to set vmlinuz-6.1.11-zen+ as default, which has an index value of 0. To do this, I'll need to use: sudo grubby --set-default-index=0. In the example command below, [index number here] is a placeholder for whatever value you need to set for Zen+ based on the Grubby output you got earlier:
grubby --set-default-index=[index number here]Verify the correct kernel has been set using the following command:
grubby --default-titleThe output should look like this:
Fedora Linux (6.1.12-zen+) 37 (Workstation Edition)
You may optionally also want to re-hide the grub menu. You can accomplish this with the following command:
grub2-editenv - set menu_auto_hideIf you'd like to see a mesmerizing graphical output, you can use neofetch, which we installed earlier, to show your basic system specs and kernel info:
neofetchThe output should look something like this:
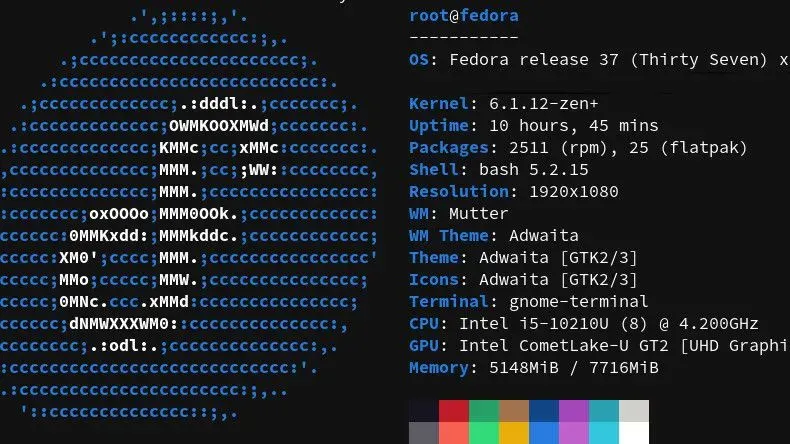
And that's it, you're done!
Revert back to previous Kernel
Should you ever decide you want to roll back to Fedora's default kernel, you can do that using the following steps:
Elevate the session to root
Give yourself super powers again...
sudo suUse Grubby to grab the index values for all installed kernels:
grubby --info=ALL | grep -E "^kernel|^index"Your output should be something like this:
index=0
kernel="/boot/vmlinuz-6.1.11-zen+"
index=1
kernel="/boot/vmlinuz-6.1.11-xanmod1"
index=2
kernel="/boot/vmlinuz-6.1.10-200.fc37.x86_64"
index=3
kernel="/boot/vmlinuz-0-rescue-3baa227c5aaf4141b094da71746960de"
In this case, Fedora's default kernel is vmlinuz-6.1.10-200.fc37.x86_64 which has an index value of 2. I'll set it using the same command we used earlier, but with the new respective kernel value (i.e sudo grubby --set-default-index=2):
sudo grubby --set-default-index=[index number here]Verify you've set the correct kernel:
sudo grubby --default-titleOptionally, you can output the index list once more using sudo grubby --info=ALL | grep -E "^kernel|^index" and remove the kernel entry from the grub menu using this command:
sudo grubby --remove-kernel=[index number here]To remove zen kernel from modules, we'll cd into that directory and list the contents:
cd /lib/modules && ls -aCopy the name of the module and replace [name] in the script below with the name of the actual module:
rm -rf [name]We can list entries for Zen kernel in the boot directory as well and remove those (if desired):
cd /boot && ls -aYou can mass remove all Zen Plus related files from the boot directory using the script below. Run once with delete commented out and carefully look over the output of the files that will be deleted. If happy with the results remove the # from -delete and rerun the command to remove the files.
find . -name "*-zen*" #-deleteTroubleshooting after reverting to Fedora's native kernel
If you encounter any issues after reverting back to fedora's native kernel, use the command (below) to download the latest iteration of Fedora's default kernel.
sudo dnf reinstall kernel && reinstall kernel* && rebootAfter reboot, use sudo grubby --default-title or the neofetch command to verify the default kernel is set correctly.
If you're still having any issues, you can resync your Fedora distro like this as a nuclear option:
sudo dnf distro-sync